8 Foolproof Tricks That Can Increase Your Driving Comfort
If you have ever struggled with parking or are not sure that everything in your car is set up correctly, this article may make a big difference.
You will be amazed at how easy it is if you know exactly what to aim.
These simple step-by-step instructions can be equally useful for experienced and new drivers and we wish we knew them when we were taking our driving test.
We prepared this selection for our readers to make driving a little bit less stressful.
1. Parallel parking
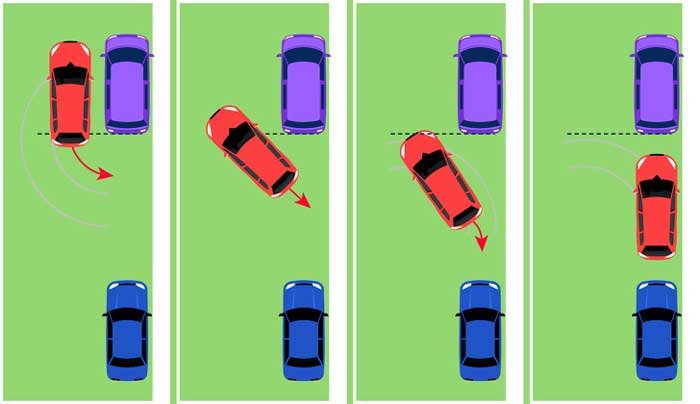 Parallel parking is a common nightmare for many new drivers. First of all, check that you have enough space. Let’s say you need to do parallel parking on the right-hand side.
You need space no less than one and a half times the length of your car.
Δ Drive forward until your car is parallel to the car in front of the parking spot, let’s call that car #1.
Δ Look over your right shoulder through the lower corner of the back window and drive backward in a straight line.
Δ When the back end of car #1 can be seen right in that corner, turn the wheel to the right, backing your car into the space.
Δ Look into the left-side mirror, when you can see the entire front part of the car behind the parking spot, let’s call it car #2, straighten out the steering wheel, backing the car in a straight line
Δ Looking into the right-side mirror, when you see the tail light of car #1, turn the steering wheel to the left, and the car will be moving into the parking space.
Δ Park the car parallel to the curb, giving car #2 enough room to drive out.
Keep in mind that you may need to drive slightly further in step #1 if your car is longer than the standard size.
[quads id=1]
2. 45° angle parking
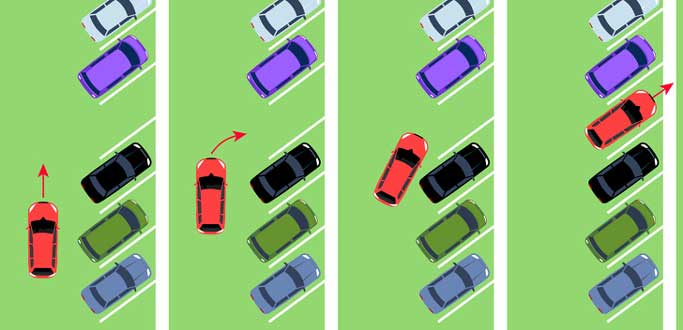 These steps apply if you need to park in an angled spot to your right.
Δ Move to your left as far as possible.
Δ Move until your right mirror is aligned with the right rear light of the car on your right.
Δ Then turn the wheel to the right and drive until you get into the spot.
Δ Turn the wheel to the left to straighten the car.
Keep in mind that you may need to do some adjustments for step #2 if your car is not a standard length.
3. Adjust the driver’s side mirror.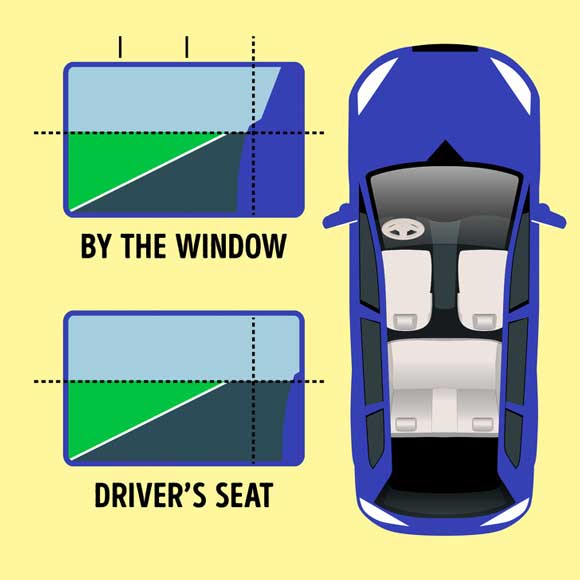
While sitting on the driver’s seat, lean to the left as close to the side window as possible and adjust the mirror so that you can see the back fender. When you are in a proper sitting position, you should barely see the side back fender.
[quads id=1]
4. Adjust the passenger’s side mirror.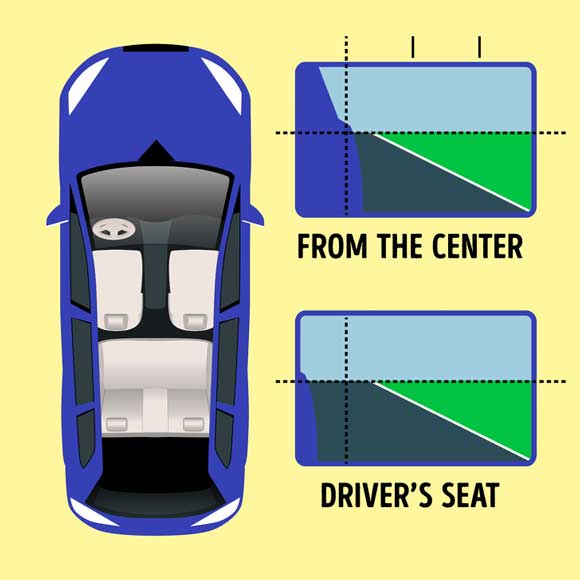
While sitting in the driver’s seat, lean to the right so your head is practically in the center of the car and adjust the mirror so that you can see the back fender. When you are in a proper sitting position, you should barely see the side back fender.
5. Adjust the rearview mirror.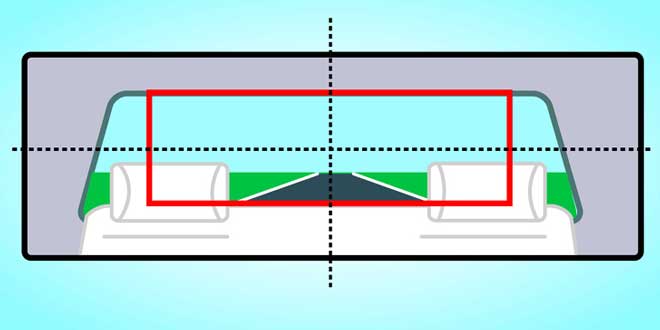
Adjust the rearview mirror so the back window is positioned right in its center.
6. Perpendicular parking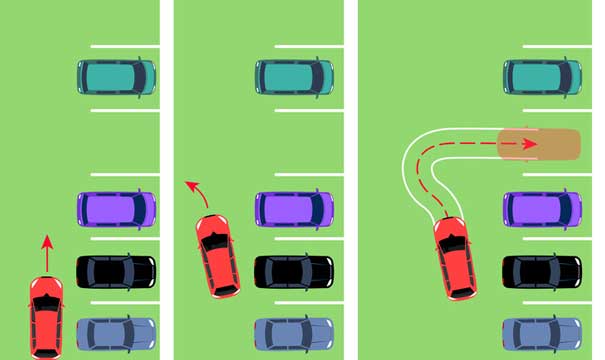
Let’s say you want to do perpendicular parking to your right.
Δ Get as far as possible to your left, keeping an eye on the incoming traffic. The further you are to your left, the easier it’s going to be.
Δ Align your right mirror with the right line of the parking spot.
Δ Moving very slowly turn the wheel to the right and drive into the parking spot until you are almost straight.
Δ Turn the wheel to the left and straighten the car.
Δ If you don’t have enough room on your left, put your car in reverse, turn the wheel to the left, and back the car up. Then put the car into drive, turn the wheel to the right, and drive into the parking spot until you straighten out the car.
[quads id=1]
7. Driver’s seat adjustment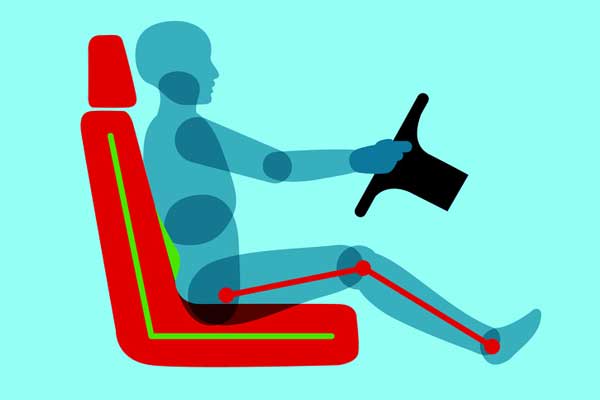
This is the first thing you should do. The correctly adjusted seat will make driving safer and less tiring.
Δ Seat height: Adjust the seat height so you can clearly see the dash panel and the road. If you’re very petite and still can’t see the instruments after maximum adjusting, consider getting a cushion or wedge to the seat.
Δ Seat position: Push the seat forward so you can reach the pedals without straightening your legs completely — your back shouldn’t move away from the back of the seat. Your knees should be slightly bent and there should be a small gap between the back of your knees and the seat.
Δ The seat’s incline: The incline of the seat’s back should be about 100°-110°.
Δ Lumbar support: If your car has lumbar support, you should adjust both the height and the depth. The low edge should be at your belt line and the depth should be supporting the curve of your lower back.
Δ Headrests: Adjust the height of the headrest so it rests in the middle of your head. Although it’s called a headrest, it’s not really for resting your head — it’s designed to protect your neck from injury in case of an accident. This means that you should have a small gap between your head and the headrest. If you can place your fist between the headrest and your head, you have the right distance.
[quads id=1]
8. Arm positioning on the steering wheel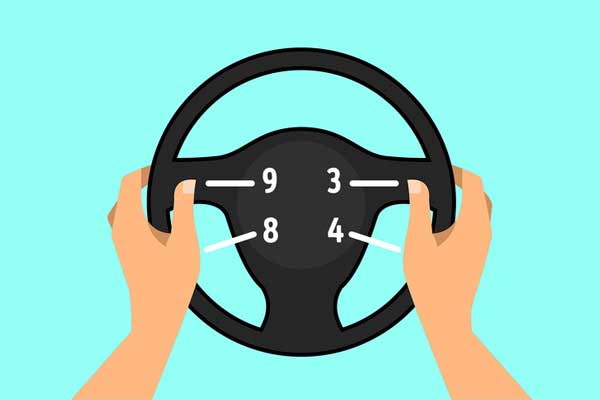
Adjusting the steering wheel is crucial for your safety.
Δ Adjust the steering wheel position so you can clearly see the instruments and you have at least 12 inches between the wheel and your body.
Δ Your hands should be slightly lower than your shoulders.
Δ The most common hand positioning trick is to imagine that your steering wheel is a clock.
Δ Most people feel comfortable holding their hands at “9 and 3” o’clock position, however, some people prefer the “8 and 4”. Both of these positions are acceptable. Choose the one that is more comfortable for you.
Δ Keep in mind that experts don’t recommend the “10 and 2” position because the hands will be in the way of the airbags in case of an accident and could lead to injuries.
Also watch:
10 Awesome Techniques to Become a Skilled Driver
Source: Brightside